
Finish Line & Display
This page works through creating a full 3D racing game step-by-step
Adding in some of your heads up display
In order for us to know if we are at the finish line, we will need a display for the racer. Ideally, this should include a lap counter, time, a finished screen and a crashed screen.
Godot Documentation for nodes discussed in this section: Controls, Labels, Signals, and Area3D.
Setting Up
Add a new scene, and add in a Control node. Name it "HUD".
Under the Layout > Anchors Preset in the Inpsector, set this to Full Rect. This means the HUD will be the full size of the game screen.
Drag this
hud.tscnscene into thecar.tscnscenes' top node (which should be VehicleBody3D).In the HUD scene, add a Panel node. This will be the top display bar, showing the timer, laps, and if the car is reversing.
2D views in a 3D gameYou will need to go into the 2D view to be able to see the Panel and our future ColorRect nodes. This is because this layer will sit right at the front of all the other objects, and won't interfere with any of the cars' 3D nodes. This means in each of your third person cameras, this "HUD" will constantly sit at the front of the display.
Change the sizing of this panel using the red dot anchors to be sitting on the top of the screen with full width. So we can see behind this panel: in CanvasItem > Visibility > Modulate, change the alpha (how transparent the object is) to halfway. And change the colour to your favourite colour!
Accessing our future labels
Global GroupsA global group is a way to organize nodes dynamically under a label that you can access from anywhere in your project. This is found under the Node tab as Groups, where you can add nodes to a specific group name, enabling a powerful way to manage, interact with, and send commands to multiple nodes at once.
Add a global group called
labels, so that we can change each of the lap, timer and reverse labels in the scripts.
Adding laps with a finish line
In the
hud.tscnscene: Add a Label into the Panel node.- Rename it to
Laps. - Set the text to
Laps: 1/3. - Change the scale to
2, to make it more visible.
- Rename it to
Move it to the top left corner of the screen.
Add the
labelsgroup to theLapslabel, you should see a rectangle with a circle inside it pop up next to its name in the scene bar.In the
track_1.tscnscene: Add a script on the Node3D.Making the finish line
Create these nodes under the Node3D (the root). - Area3D (named "FinishLine") - CollisionShape3D (with a shape of BoxShape3D) - MeshInstance3D (with its mesh being BoxMesh and having a size of
x=8.5, y=1, z=2) - Add a new StandardMaterial3D with a finish line picture like this (using the Albedo texture).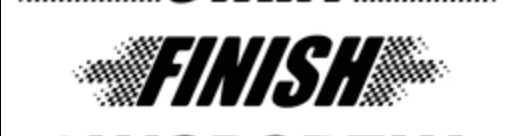 You will need to play around with the UV1's scale. The numbers I ended up with was
 x=3, y=2.02, z=0.Add a signal to "FinishLine" Area3D check whether the car has exited the area (so we will be able to check if the car has done a lap). To do this, you need to go in Node > Signals tab on the right, press
body_exited(body: Node3D), and clickConnectdown the bottom.Inside our newly created script, add this code to update the laps each time. Make sure to read and understand the code!
# Variables to manage laps
var maxLaps = 3     # Total laps to complete the race
var currentLap = 1  # Current lap the vehicle is on

# Variable to store references to all labels in the "labels" group
var labels

# Called when the node enters the scene tree for the first time
func _ready() -> void:
    # Get all nodes in the "labels" group
    labels = get_tree().get_nodes_in_group("labels")

# Called when the vehicle exits the finish line area (signal from finish line Area3D)
func _on_finish_line_body_exited(body: Node3D) -> void:
    if body is VehicleBody3D: # Check if the body that exited is the vehicle
        # Check if the forward camera is active (not reversing into finish line)
        if body.camera_3d.current == true:
            # Check if the car hasn't finished
            if currentLap != maxLaps:
                # Increase lap count, reset checkpoint flag, and update the lap label
                currentLap += 1
                var labelLaps = labels.filter(func(label): return label.name == "Laps")[0]
                labelLaps.text = "Laps: " + str(currentLap) + "/" + str(maxLaps)
You will now be able to test it out, and each time you cross the finish line, the laps will increase!
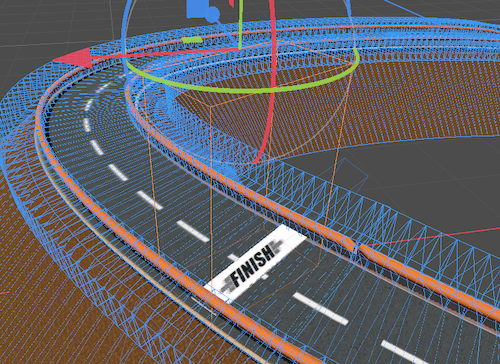
You will need to check the finish line Area3D is shaped for the width and height of the track and car.
Checkpoints
We will need more precise lap counting than just checking if the car is facing forward. Checkpoints across the track will help keep count of the actual laps the car has done.
Add the same nodes (apart from the MeshInstance3D) and a signal like the finish line's.
Name the Area3D "Checkpoint".
These checkpoints will be invisible. You will need to put them around the track. For the sake of time, I have only added one 'halfway' checkpoint, but it is recommended to do more.
Then add this code to the connected function from the signal you made.
var passed_checkpoint = false # Flag to ensure vehicle passes a checkpoint before completing a lap
# (exisiting code here)

func _on_finish_line_body_exited(body: Node3D) -> void:
    if body is VehicleBody3D:
        # Check if the forward camera is active (no reversing into finish line) AND checkpoint has been passed
        if body.camera_3d.current == true && passed_checkpoint:
            # Check if the car hasn't finished
            if currentLap != maxLaps:
                # (exisiting code here)
                passed_checkpoint = false # Reset checkpoint flag for the next lap

# Called when the vehicle exits a checkpoint area (signal from checkpoint Area3D)
func _on_checkpoint_body_exited(body: Node3D) -> void:
    # Check if the vehicle is the one triggering the checkpoint and the main camera is active
    if body is VehicleBody3D && body.camera_3d.current == true:
        passed_checkpoint = true # Mark checkpoint as passed, allowing lap completion
Now, if you turn around before passing this checkpoint and go through the finish line, the lap counter won't increase!
Adding a timer
- To make a race car timer, we will need milliseconds, seconds, and minutes.
- In the
hud.tscnscene: Copy and paste the 'Laps' label. Rename it toTimeand move it to the top right hand corner of the screen. Set the text toTime: 00:00.000. - Add this code to your existing code.
If you understand the comments, feel free to delete them to reduce script clutter.
# Variables for timer var time = 0.0 # Total time elapsed since the start of the race in seconds var minutes = 0 # Minutes component of the time display var seconds = 0 # Seconds component of the time display var msec = 0 # Milliseconds component of the time display # Called every frame, where 'delta' is the elapsed time since the previous frame func _process(delta: float) -> void: # Update the total time by adding delta (time since last frame) time += delta # Calculate milliseconds, seconds, and minutes for time display msec = fmod(time, 1) * 100 seconds = fmod(time, 60) minutes = fmod(time, 3600) / 60 # Format the time as a string (MM:SS.mmm) for display var timeString = "%02d:%02d.%03d" % [minutes, seconds, msec] # Find the label displaying the time (assumes a label named "Time" is in the labels group) var labelTime = labels.filter(func(label): return label.name == "Time")[0] labelTime.text = timeString - Well done! You now have a working timer for your racing. Now you can see who the fastest race car driver is!
Adding in a reverse state (optional)
- If our car is still quite symmetrical, it would be easier to add in a reversing label so we can see if we are reversing or not.
- In the
hud.tscnscene: Copy and paste the 'Laps' label. Rename it toReversingand move it next to the Laps label. Set the text toReversing.... Set the colour to red. Uncheck the Visible (or the eye icon), as we only want it to show up when we reverse. - In our
car.gdscript, we will be able to put this label inside the script using our global grouplabels.var labels var reverse_label # (existing variables) func _ready() -> void: camera_look_at = global_position # Find our labels group, and filter them until we've found our reverse label labels = get_tree().get_nodes_in_group("labels") reverse_label = labels.filter(func(label): return label.name == "Reversing")[0] # (existing functions) func _check_camera_switch(): if linear_velocity.dot(transform.basis.z) > -1: camera_3d.current = true reverse_label.hide() # We're driving forward else: reverse_camera.current = true reverse_label.show() # We're reversing!
Making the finished state
Once we've finished the race, we celebrate with a finish screen!
In the
hud.tscnscene: Add a ColorRect node under the main Control node.- Rename it to
FinishedLeveland change it's size to the whole screen. - Change the colour to transparent(ish) green.
- Uncheck the Visible (or the eye icon), as we only want it to show up when we finish the track.
- Add it to the
labelsglobal group (in Node > Signals). - Add a Label as a child of ColorRect and set the text to
You've finished the track!. Set the scale to 3.
- Rename it to
Inside our
track_1.gd, make some changes to our_on_finish_line_body_exitedfunction, and add in astopfunction.func _on_finish_line_body_exited(body: Node3D) -> void: if body is VehicleBody3D: # Check if the body that exited is the vehicle # Check if the main camera is active and checkpoint has been passed if body.camera_3d.current == true && passed_checkpoint: # Check if the current lap is the last one if currentLap == maxLaps: # Display "Finished Level" label to indicate race completion var finishedLevel = labels.filter(func(label): return label.name == "FinishedLevel")[0] finishedLevel.show() stop() # Stop processing further laps else: # Increase lap count, reset checkpoint flag, and update the lap label currentLap += 1 var labelLaps = labels.filter(func(label): return label.name == "Laps")[0] labelLaps.text = "Laps: " + str(currentLap) + "/" + str(maxLaps) passed_checkpoint = false # Reset checkpoint flag for the next lap # Function to stop the timer and prevent further processing func stop() -> void: set_process(false)
Making the crashed state
In the
hud.tscnscene: Add a ColorRect node under the main Control node.- Rename it to
CrashedScreenand change it's size to the whole screen. - Change the colour to transparent(ish) red.
- Uncheck the Visible (or the eye icon), as we only want it to show up when we crash.
- Add it to the
labelsglobal group (in Node > Signals). - Add a Label as a child of ColorRect and set the text to
You crashed! Restart the game.. Set the scale to 3.
- Rename it to
Inside our
car.gd, make some changes to our_physics_processand_readyfunctions.var crash_timer = 0.0 var crash_threshold = 3.0 # Time in seconds before considering it crashed var crash_screen func _ready() -> void: # (exisiting code) crash_screen = labels.filter(func(label): return label.name == "CrashedScreen")[0] func _physics_process(delta: float): # (exisiting code) # if the car has crashed: Check if the vehicle is upside down if transform.basis.y.dot(Vector3.UP) < 0: crash_timer += delta if crash_timer >= crash_threshold: crash_screen.show() else: crash_timer = 0.0 # Reset timer if not upside down
Current File Structures
The heads up display file structure:
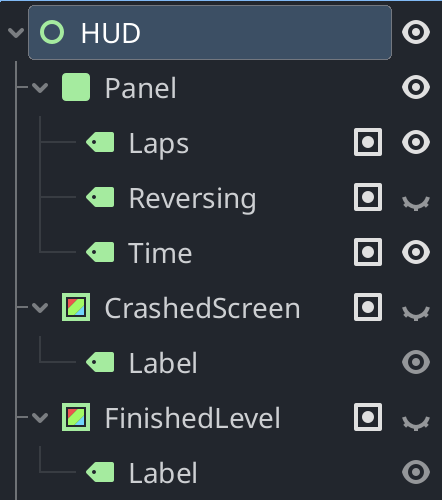
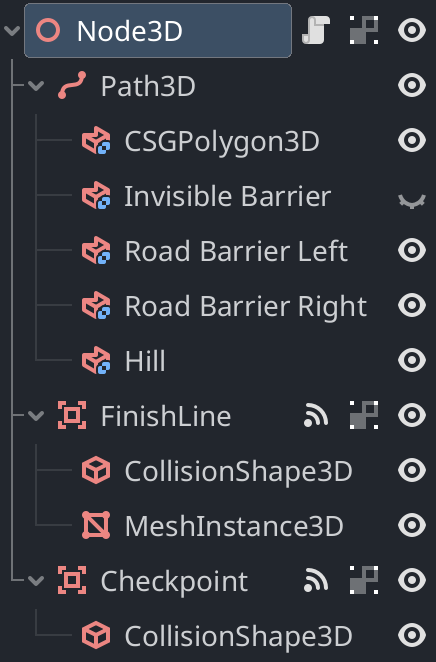
The track 1 file structure:
I've made...
- A race timer
- A reverse state
- A finished state
- A crashed state
- A lap counter
- A finish line