
Menu and Levels
This page works through creating a full 3D racing game step-by-step
Godot Documentation for nodes discussed in this section: User Interface, PackedScene, ButtonGroup, SceneTree(for changing the current scene via gdscript), and VBoxContainer(for the HUD pause menu button).
Adding in a title screen and new levels
Create a new scene and name it
main_menu.tscn.Add these nodes to the scene tree:
A Control node and name it "Main Menu". Then add these nodes as children:
A Label which will be your games' name.
Improving your games' aestheticIf you want your labels and buttons to look nice, change the properties in
Theme Overrides.Take a look on this link here for further information.
A TextureRect (for photos) or ColourRect (for just a colour) which will be the background for your games main menu.
A "Start Game" Button. You can also change the font/colour themes for the buttons too.
A "Levels" Button.
An "Exit" Button.
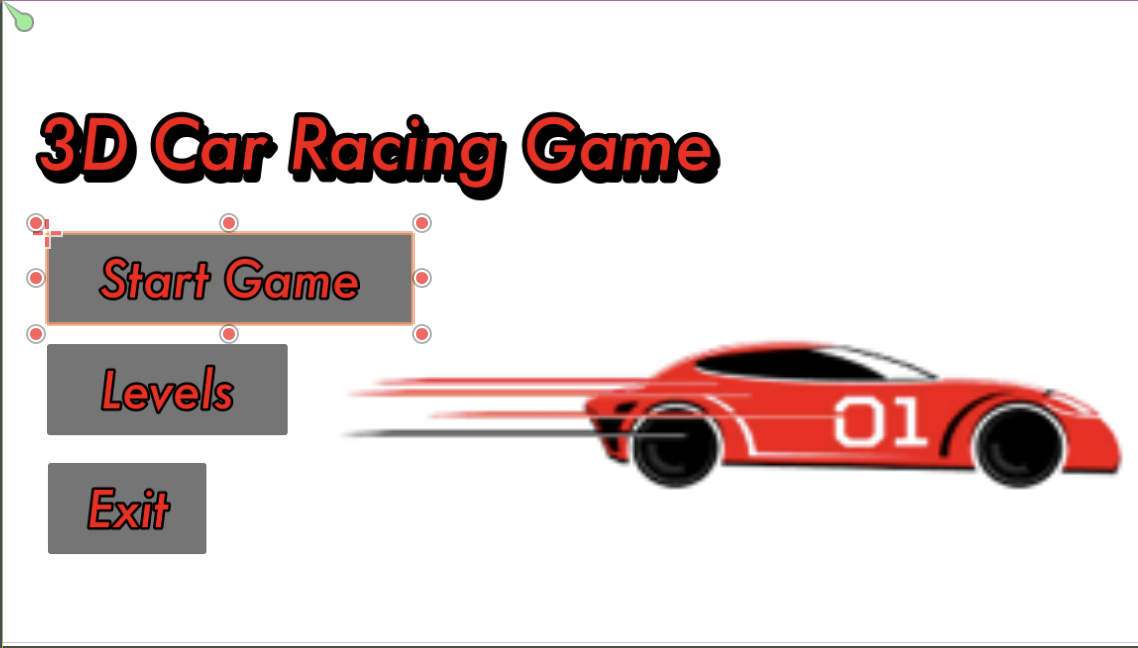
It could look something like this:
Change this scene to your main scene. Do this by clicking
Project > Project Settings > Application > Runand changing the "Main Scene" tomain_menu.tscn.Add a script to your "Main Menu" Control node. Leave this for now.
Connect your three buttons when each "BaseButton" is pressed.
Can't remember how to connect a signal?Click on the
Nodetab on the right hand sidebar, selectPressed(in this case) and clickConnect...down the right hand side of the bar. You should also see that these three functions come up in the code:func _on_start_game_pressed() -> void: pass func _on_exit_game_pressed() -> void: pass func _on_levels_pressed() -> void: passCreate a new scene and name it
levels_menu.tscn.Copy
CMD/CTRL Cand pasteCMD/CTRL Vall themain_menu.tscnnodes into this scene. Change these nodes in the scene tree:Name the Control node "Levels Menu".
Keep the Label the same.
Keep the TextureRect or ColourRect the same.
Remove the Signal connection from the "Start Game" Button and rename it to "Level 1".
Removing signal connection: Select the
Node > pressed()function andCMD/CTRL BACKSPACEit.Remove the "Levels" Button.
Remove the "Exit" Button.
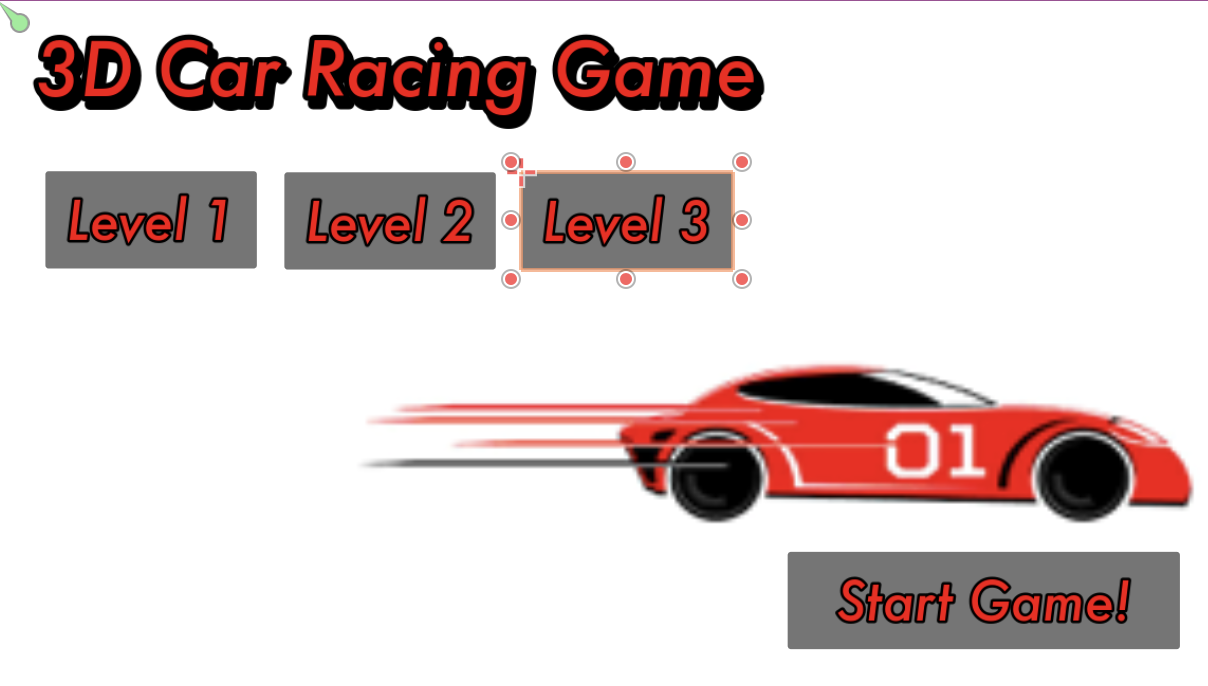
It could look something like this:
In the "Level 1" Button, check the
Inspector > BaseButton > Toggle Modeto "On".In the same section, click the down arrow in the ButtonGroup and click
New ButtonGroup.Click the down arrow again and click "Save As..." and name it
levels.tres.Copy and paste this Button according to the number of levels you want to have. I have done 3. Make sure each Level Button is in the
levels.tresButtonGroup!!Add a new script onto the root node of
levels_menu.tscn. You might need to remove the previous script if you copy/pasted it frommain_menu.tscn.Add a "Start Game" Button and connect a pressed() Signal to it. You should know how to do this.
Create a new track!
Create a new scene and name it
track_2.tscn. In the code later on, you'll see why these tracks need thetrack_[num].tscnnaming convention!Click
track_1.tscnand click the top Node3D. Copy and paste this into your new track scene.- You'll notice it pastes everything in there. In order to just change your new track without also changing the first track, you'll need to delete everything apart from the top node.
- After this, go into your
track_1.tscnand copy everything underneath the top node. Paste this into yourtrack_2.tscn. While it's still all selected, right-click these nodes and click Access as Unique Name. - This should make each track unique, so that you can change the Path3D points without worrying about messing up your original track!
Now change/add/remove your Path3D points and Area3D Checkpoint/s to create a harder or longer track.
- If you have spare time, feel free to change the textures for a different look on each track.
New Track RequirementsYou will need to keep the finish line / start line area the same in each track you make, as the car in the
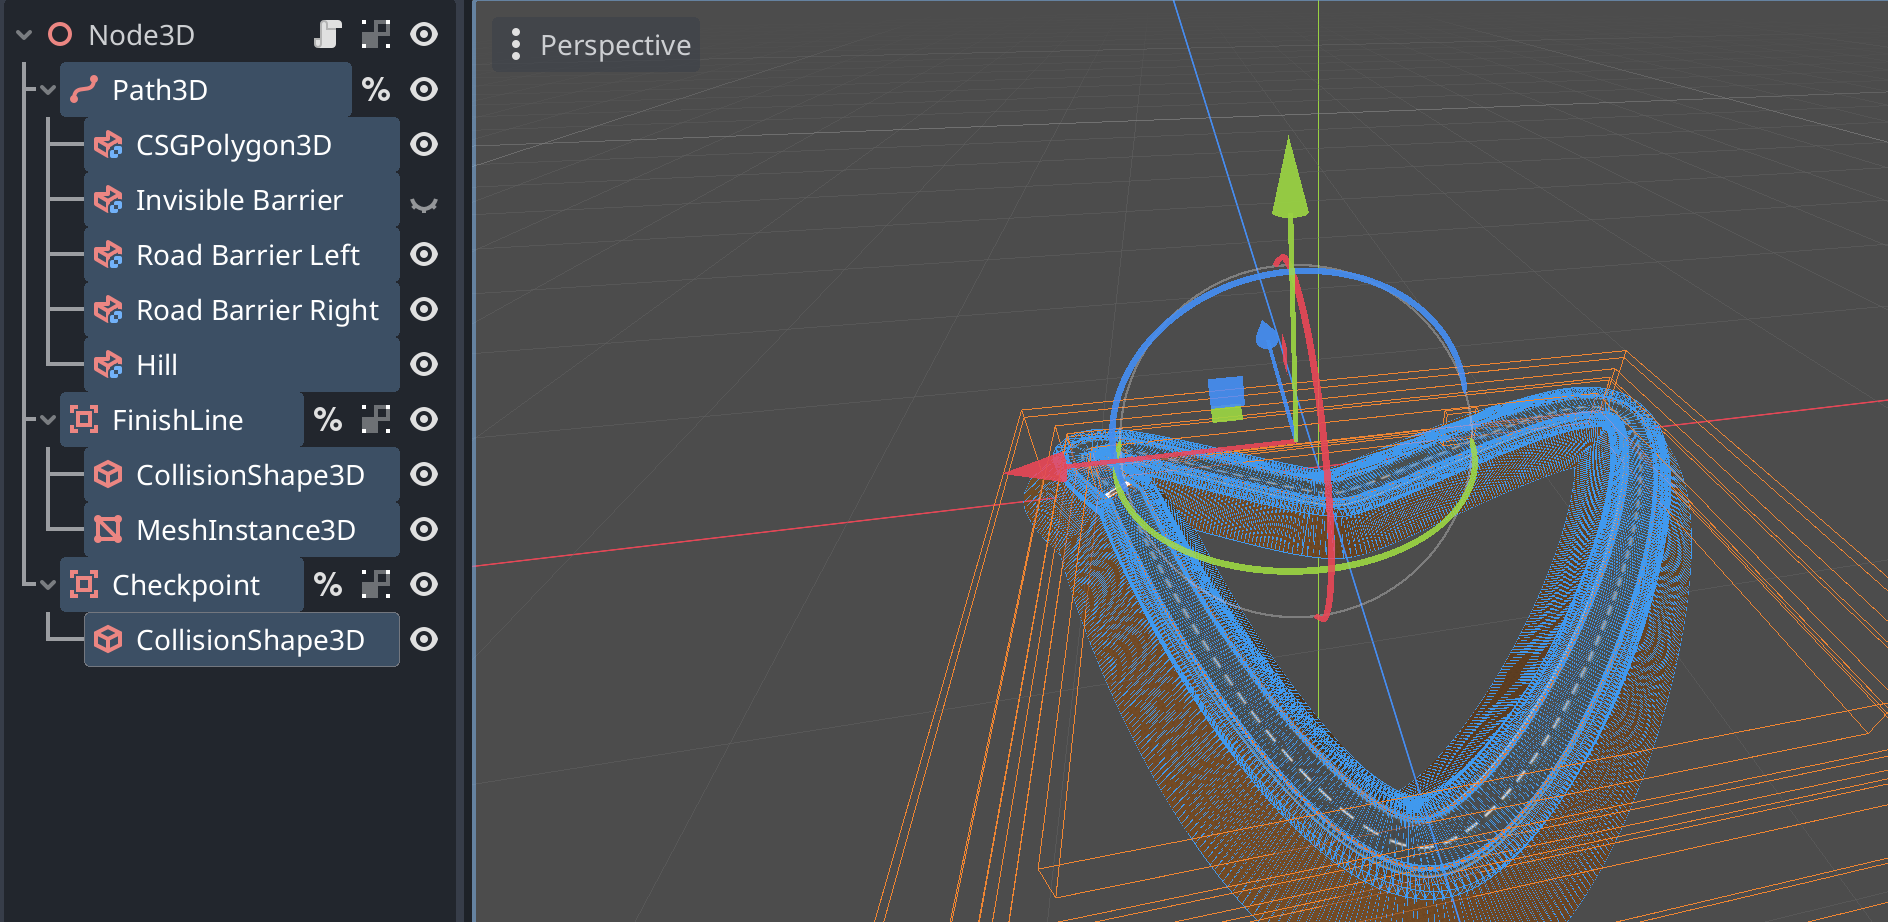
world.tscnwill start in the same position each time.This is what my new track looks like!
Adding functionality to the levels menu and main menu
So far, when you play these two scenes, nothing will happen.
For the levels menu, players should be able to choose a level, and the script will load the appropriate track. If they pick the first level, the default world scene is used. For other levels, the script dynamically modifies the world to include the chosen track.
Add this code to the levels_menu.tscn script.
Go through each line and read the comments to understand why it's there.
GDScript Code for the levels menu
```gdscript title="levels_menu.gd" extends Control# The 'levels.tres' button group, used for which level the player has selected.
@onready var button_group = $"Level 1".button_group
# Preloads the base world scene. This is the template for all levels.
@onready var world = preload("res://world.tscn") as PackedScene
func _ready() -> void:
pass
func _process(delta: float) -> void:
pass
# When the "Start Game" button is pressed.
func _on_start_game_pressed() -> void:
# Get the level number from the selected button's name (e.g., "Level 1").
var num = button_group.get_pressed_button().name.split(" ")[1]
# If the selected level is "1", just load the default world scene directly.
if (num == "1"): # Level 1 is already part of the base world scene.
get_tree().change_scene_to_packed(world) # Switch to the base world scene.
else:
# For levels other than 1, modify the world scene with the chosen track.
change_world_level(num)
# This function creates and loads a custom world for the selected level.
func change_world_level(num):
# Create an instance (a copy) of the base world scene to modify it.
var world_instance = world.instantiate()
# Check if there's already a track in the base world and remove it.
var track_1 = world_instance.get_node_or_null("Track") # Look for an existing track node.
if track_1:
world_instance.remove_child(track_1) # Detach the track node from the world.
track_1.queue_free() # Delete the old track from memory.
# Load the new track scene based on the chosen level number.
var new_track = load("res://track_" + str(num) + ".tscn") as PackedScene
var new_track_instance = new_track.instantiate() # Create an instance of the new track.
# Add the new track to the world instance.
world_instance.add_child(new_track_instance)
new_track_instance.name = "Track" # Name the new track so it can be identified later.
new_track_instance.owner = world_instance # Set ownership so the track is saved properly.
# Create a new PackedScene to store the modified world with the new track.
var new_world = PackedScene.new()
if new_world.pack(world_instance) == OK: # Try to "pack" the modified world into a new scene.
# Define a temporary file path to save the new world scene.
var temp_scene_path = "user://temp_world.tscn"
# Save the packed scene to the temporary file path.
ResourceSaver.save(new_world, temp_scene_path)
# Load the saved scene into the game.
get_tree().change_scene_to_file(temp_scene_path)
else:
# If packing the scene fails, print an error message for debugging.
print("Error: Could not pack the modified world scene!")
```
After you've read the comments and understand most of the code, feel free to delete it to reduce clutter.
Now add this code to the main_menu.tscn script.
This script is for the main menu of your racing game.
It handles actions when players click buttons like Start Game, Choose Level, or Exit Game. Depending on what
the player selects, the game either starts, shows the level selection screen, or exits.
Go through each line and read the comments to understand why it's there.
GDScript Code for the main menu
```gdscript title="main_menu.gd" extends Control# Preloads the default starting level scene. This is the first race track.
@onready var start_level = preload("res://world.tscn") as PackedScene
# Preloads the level selection menu scene. This screen lets the player pick a specific level.
@onready var choose_level = preload("res://levels_menu.tscn") as PackedScene
func _ready() -> void:
pass
func _process(delta: float) -> void:
pass
# This function is called when the "Start Game" button is clicked.
func _on_start_game_pressed() -> void:
# Switches the game to the default starting level.
get_tree().change_scene_to_packed(start_level)
# This function is called when the "Exit Game" button is clicked.
func _on_exit_game_pressed() -> void:
# Quits the game application.
get_tree().quit()
# This function is called when the "Choose Levels" button is clicked.
func _on_levels_pressed() -> void:
# Switches the game to the level selection menu.
get_tree().change_scene_to_packed(choose_level)
```
Adding in a pause menu in the HUD
If you want to pause the game and switch levels or restart your current game if you've crashed, we'll need a popup menu!
Here's a preview of the end result:
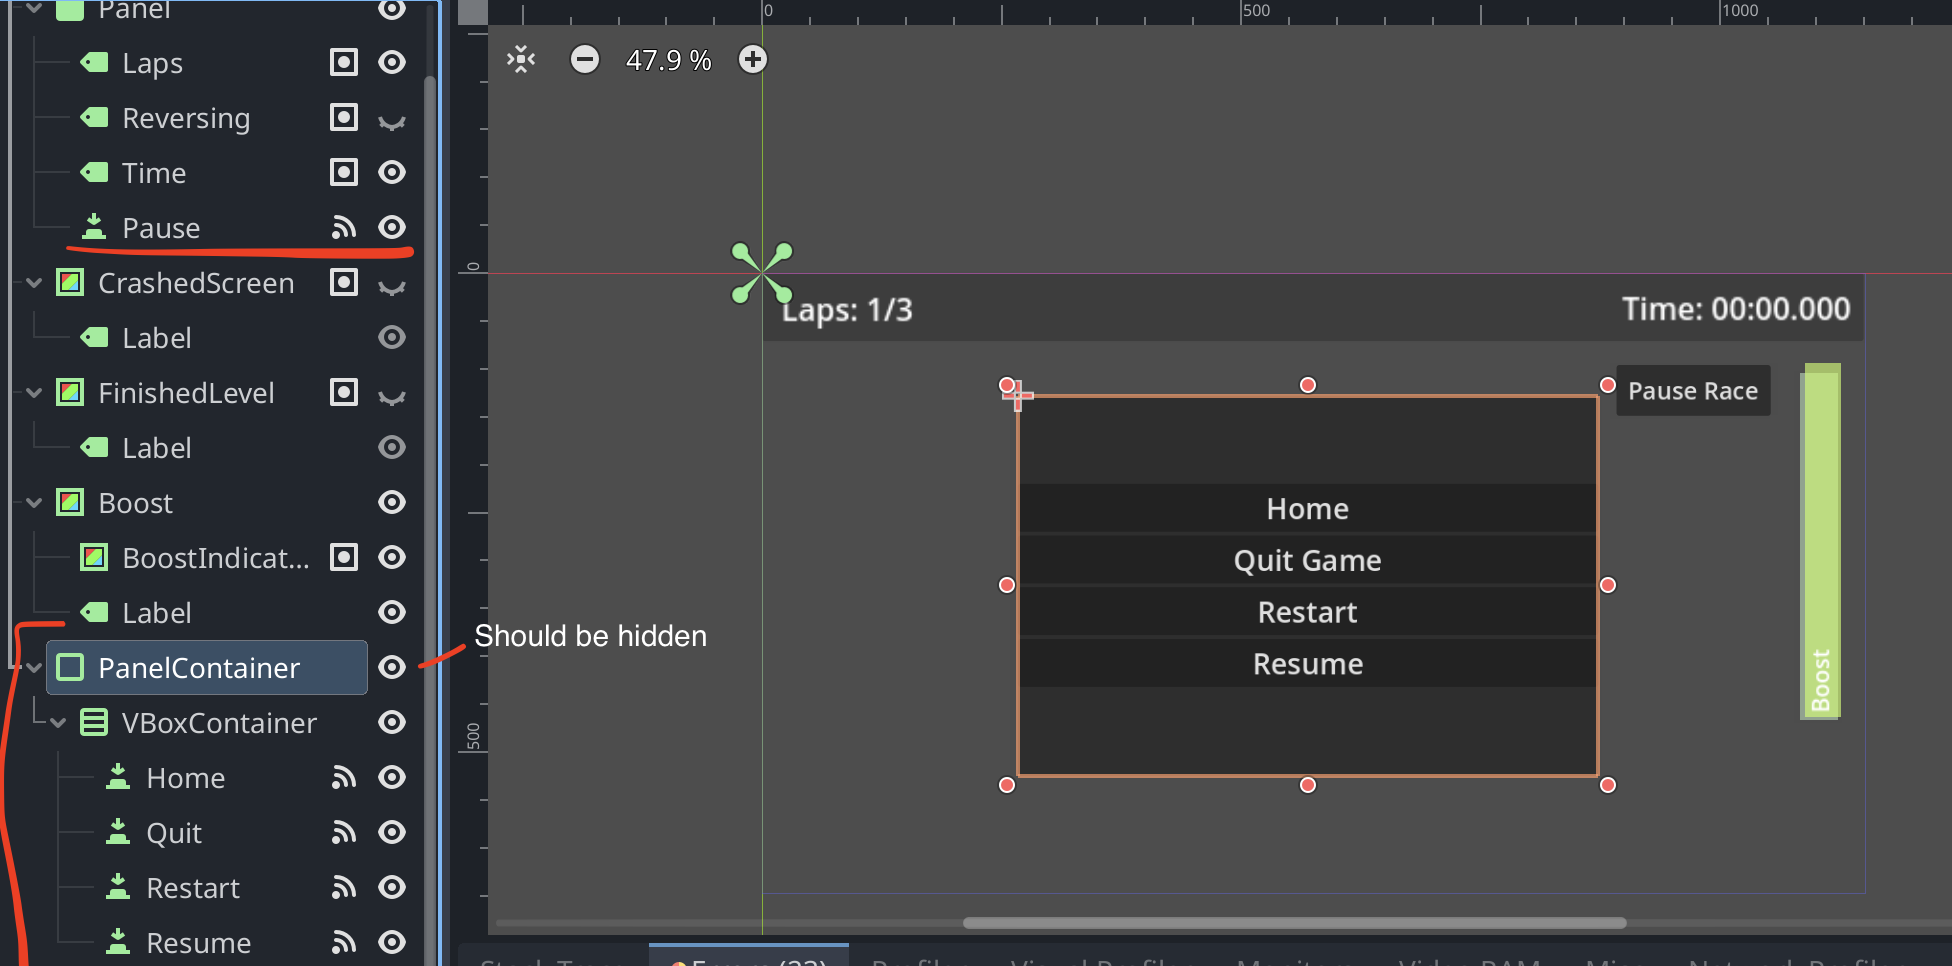
The red lines indicate the new nodes that you will be adding into your HUD scene.
Inside the
hud.tscnscene, add a script to the root Control node. This will be for connecting signals for the various buttons - like restarting the game - and the functions to do this.Under your Panel which contains the "Laps", "Reversing", and "Time" labels, add a "Pause Race" Button.
Connect a "pressed()" signal via the
Nodetab on the sidebar.Turn the
Inspector > Visibility > Top Levelto "On", so you can still interact with the Button when the crashed and finished screens come up. I also changed the font size to25px.Add a PanelContainer to the root node of this scene. Center this on your HUD scene.
Adding the VBoxContainer
In the inspector, you can change the alignment to "Center".
Add 4 Button's to your VBoxContainer. Name them "Home", "Quit Game", "Restart", and "Resume".
Each Button should have: - Font size 30px. - A "pressed()" signal connected to the
hud.gdscript. Each function name needs to be different.Go to your
hud.gdscript.Add this functionality for each of the buttons to work properly.
extends Control

# Reference to the pause menu UI (a PanelContainer node in your scene).
@onready var pause_menu = $PanelContainer

# Preloads the main menu scene so it’s ready to load when the player chooses to go home.
@onready var home_scene = preload("res://main_menu.tscn") as PackedScene

# This function runs when the node enters the scene tree for the first time.
func _ready() -> void:
    # Hide the pause menu when the game starts.
    pause_menu.hide()

func _process(delta: float) -> void:
    pass

func _on_pause_pressed() -> void:
    # Show the pause menu and pause the game.
    pause_menu.show()
    get_tree().paused = true  # This stops the game’s logic and animations.

func _on_home_pressed() -> void:
    # Unpause the game and hide the pause menu before going to the main menu.
    get_tree().paused = false
    pause_menu.hide()
    get_tree().change_scene_to_file("res://main_menu.tscn")  # Switch to the main menu scene.

func _on_quit_pressed() -> void:
    # Quit the game application.
    get_tree().quit()

func _on_restart_pressed() -> void:
    # Unpause the game and reload the current level.
    get_tree().paused = false
    get_tree().reload_current_scene()  # Reloads the currently active scene.

func _on_resume_pressed() -> void:
    # Hide the pause menu and unpause the game to continue playing.
    pause_menu.hide()
    get_tree().paused = false
- I've made title screen.
- There are 2 or more levels to play.
- I've made a levels page.
- I can pause, play, and exit a game!