
Player Improvement
Upgrading our player scene
Godot Documentation for nodes discussed in this section:
Let's spend some time further improving our player. Let's implement some different controls (Well be doing WASD, but you can using any controls you like) make sure our animation changes to our walking animation when we move, and make sure our sprite faces in the direction we're moving.
We'll also be implementing attacking, but we'll do that in its own section!
Input mapping
To change our inputs, we'll first need to set up our Input Map to do this, we'll navigate to Project -> Project Settings in the top left of the workspace.
Then, open the Input Map tab.
We'll add our new Inputs by typing a name for each of them in the Add New Action box and hitting add.
I'll be calling mine "Up" "Down" "Left" "Right" and i'll also add one called "Attack"
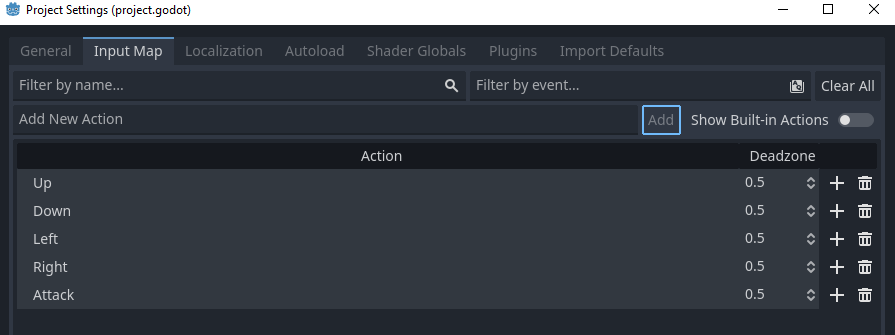
To add buttons to these, we'll hit the "+" to the right of each action, we'll then physically press the key we want to assign on our keyboard, and hit "Ok"
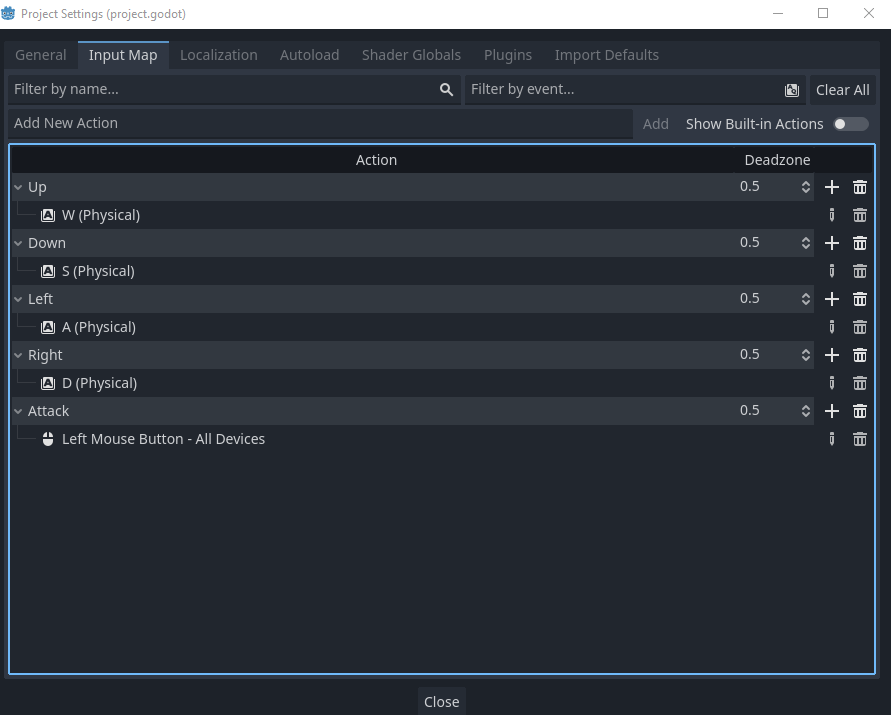
For my Attack action i'll be using *Left Click for which you'll want to physically click once inside the Listening for input box.
Here's what my inputs look like:
If you're happy with your inputs, you can then hit Close at the bottom of the screen. Let's navigate back to our player_movement.gd script. This can be done by opening our player scene, clicking on the CharacterBody2D and clicking the Script tab at the top of the screen.
To change our inputs in our script, all we need to do is change the predefined inputs to what we called ours!
Case SensitivityWhat you named your input actions is case sensitive
So, "ui_left" becomes "Left" "ui_right" becomes "Right" and so on!
leaving that line in our script looking like this:
var direction = Input.get_vector("Left", "Right", "Up", "Down")
if you run your game, you'll notice your inputs are now changed!
We won't use our Attack input just yet, but it's good we've created it already.
Animation switching
To change our animation depending on if we're moving or not, we'll only need to add a few lines to our script. But first, we'll need a reference to our AnimatedSprite2D in our script.
We can do this easily, by Clicking and Dragging our AnimatedSprite2D into our script, making sure we hold Ctrl on the keyboard after grabbing it, but before dropping it.
We'll want to drop it below the speed variable declaration
@export var speed = 200
@onready var animated_sprite_2d = $AnimatedSprite2D
if it doesn't look like this, delete the line and try again, making sure you're holding Ctrl on your keyboard after picking it up, and before letting go of left click.
Great! Let's get to changing our animation!
Under where we set our velocity, we'll simply add a check to see if our velocity is 0 and change our animation based on that! If it's 0, we'll idle, if not, we'll do our movement animation!
We can check this simply with:
if velocity == Vector2.ZERO:Vector2sWhy can't we just do velocity == 0? This is because velocity actually contains both our X (Horizontal) and Y (Vertical) velocity, so we need to make sure Both are zero.
Then, we can play our idle animation!
if velocity == Vector2.ZERO:
    animated_sprite_2d.play("idle")
If we're moving, let's play our walk animation
else:
    animated_sprite_2d.play("walk")
Giving us a movement script that looks like this:
extends CharacterBody2D

@export var speed = 200
@onready var animated_sprite_2d = $AnimatedSprite2D

func _physics_process(delta):
    var direction = Input.get_vector("Left", "Right", "Up", "Down")
    velocity = direction * speed

    move_and_slide()

    if velocity == Vector2.ZERO:
        animated_sprite_2d.play("idle")
    else:
        animated_sprite_2d.play("walk")
Play your game, and you'll notice your animation changes when you move!
Sprite facing
To flip our player based on the direction we're moving, all we really need to do is add another If to check only the Horizontal part of our velocity, as thankfully the AnimatedSprite2D node has a built-in way to flip our sprite!
I'll be adding this section beneath the animation section.
Let's start by checking the Horizontal portion of our movement:
if(velocity.x < 0):If our x velocity is less than 0 (moving to the left) we want to flip our sprite.
animated_sprite_2d.flip_h = trueAnd if it's greater than 0, we'll unflip it
elif(velocity.x > 0):
    animated_sprite_2d.flip_h = false
Giving us a movement script that looks like this:
extends CharacterBody2D @export var speed = 200 @onready var animated_sprite_2d = $AnimatedSprite2D func _physics_process(delta): var direction = Input.get_vector("Left", "Right", "Up", "Down") velocity = direction * speed move_and_slide() if velocity == Vector2.ZERO: animated_sprite_2d.play("idle") else: animated_sprite_2d.play("walk") if(velocity.x < 0): animated_sprite_2d.flip_h = true elif(velocity.x > 0): animated_sprite_2d.flip_h = falseFlippingWhy didn't we juse use else:? - If we'd just used Else: our sprite would have jarringly flipped to face left whenever we stopped moving, or if we were just moving up and down. This way the direction our sprite is facing doesn't change unless we move either left or right!
Test your game, and you'll notice your sprite now faces left or right depending on the direction we're facing!
- I've setup the Inputs
- My sprite flips from left to right
- My sprite's animations change