
Player Health
Implementing the player health system
Godot Documentation for nodes discussed in this section:
Signals User Interface Timer Labels Groups Singletons (Autoload)
This section is going to be quite complicated, but once it's done, we'll have laid the groundwork for a lot of the later features of our game! (Like pickups!)
Giving our player Health
Let's start setting up our health system on the player side!
We'll start by adding a new Node to our player Scene, as a child of the root CharacterBody2D node. The node should be of type Area2D give the Area2D a child of type CollisionShape2D rename the Area2D to "Hitbox."
In the Inspector of the Area2D Navigate to the Collision section. Deselect all numbers under the Layer Section, and ensure only 2 is selected under the Mask Section.
Give the CollisionShape2D a shape, ideally a rectangle or circle, and make it slightly bigger than the shape for the CharacterBody2D's CollisionShape2D
This is so that things can actually overlap with our hitbox, as if it was smaller, they would impact the characters physical body before overlapping the hitbox.
Let's give the Area2D one more child of type Timer and name it "damageTimer" this timer will be used to determine how quickly we can take damage again after being hurt, think of it as invulnerability time! In the timer's inspector, set its Wait Time field to 0.5s
Great! this Area2D will be used to detect collision with enemies, potions, and coins! For now we'll just be setting it up to handle health, both healing and damage.
Let's attach a script to the Area2D (that we named "Hitbox") and call it "hitbox.gd"
This script is going to get a little complicated, as it's going to have to handle quite a few things. In a bigger project we would want to break its functionality up into multiple scripts, but for our scope this is fine! Let's break down what we need it to do:
- Track our health
- Detect collisions with potions/enemies/coins
- Change our health value
- Update the UI
Let's start by creating the variables we'll need, those being:
- The signal we'll use to talk to the UI when our health has changed
- While we're here, a signal for when we've collected a coin, as it'll also talk to the UI
- A max health, and current health value
- A reference to the timer we created.
- A boolean determining if we can take damage
These should look something like this, using the same click + drag + ctrl method to get the reference to the Timer
signal on_health_changed(new_health : int) signal on_point_gained @export var max_health : int = 6 @onready var damage_timer = $damageTimer var health : int var can_take_damage : bool = true\@exportWe can use the @export to modify the max health value, without editing the script!
HealthWhy are we starting at 6 health? We're doing this because each point of health will represent half a heart to the UI, for a total of 3 full hearts! Using ints like this is safer than using a float, because what if we somehow end up with 0.001 health!
In our _ready function we'll want to set some default values, and emit the health_changed signal to send our starting health to the UI.
func _ready():
    damage_timer.connect("timeout", allow_damage)
    health = max_health
    emit_signal("on_health_changed", health)
Right, let's get onto the most complicated function in the script, the function for taking damage! In this function, there'll be a few different possible outcomes.
- We can't take damage as we're currently immune. In this case. Nothing happens
- Otherwise we'll take damage. Emitting the signal to change the UI.
- If we do take damage, we might be reduced to 0 hitpoints
- If we are, we die! If we're not. We start our immunity timer.
It can be helpful to visualise things like this in a flowchart, if you're having trouble understanding the function, try drawing out how it works!
Great! Let's write that in gdscript:
func take_damage():
    if can_take_damage:
        health = health - 1
        emit_signal("on_health_changed", health)

        if health <= 0:
            get_tree().paused = true
        else:
            can_take_damage = false
            damage_timer.start()
You'll notice we connected our timer to a function called allow_damage() which doesn't exist, let's create that now. All it's going to do is set the can_take_damage boolean to True as unfortunately Godot doesn't let you assign a value to a variable directly via the connect() function.
func allow_damage():
    can_take_damage = true
Next we'll do healing! This one is much easier. We just need to check if we have room to be healed (Our health is less than our max health). If we do, increase our health by 1. Then emit the signal to update the UI! We'll also want to delete the potion, so it can no longer be used.
If you wanted, you could get edit this to take an input of an int to allow for variable healing. But for now we'll just assume all healing is 1 health.
func heal(body):
    if health < max_health:
        health = health + 1
        emit_signal("on_health_changed", health)
        body.queue_free()
Finally, we need a function that calls heals us and gives us points based on what we've collided with. To check what type of object we've collided with, we'll be using Groups! These are something we'll assign to our enemies/potions/coins later.
To check if something has collided with us, we'll need to the on_body_entered signal! To connect this, swap to the Node tab of the Inspector and click on the Area2D node in the SceneTree again. You'll see a list of all the signals we have available to us! Click the on_body_entered signal and press Connect select the Area2D (hitbox) node and click Connect
You'll see a new function appear in our script! On that'll be called whenever something enters this Area2D
In here, we can check the Group of what we've collided with! Let's also add a check to see if we've collected a coin here, to save us some time later!
func _on_body_entered(body):
    if body.is_in_group("health"):
        heal(body)
    elif body.is_in_group("coin"):
        emit_signal("on_point_gained")
        body.queue_free()
Next, let's take damage from any enemies touching us! Now, we could do this based on enemies entering our hitbox as in the above step, but what if an enemy remains inside our hitbox? It should keep damaging us! So we need a different approach using the _process function.
We'll want to: get any bodies overlapping our hitbox, check if any are enemies, if they are, we'll take damage! Dont' worry that we're running this code every frame, our damageTimer will prevent us from taking extra damage!
func _process(delta):
for body in get_overlapping_bodies():
    if body.is_in_group("enemy"):
        take_damage()
that's it! Giving us a full script that looks something like this:
extends Area2D signal on_health_changed(new_health : int) signal on_point_gained @export var max_health : int = 6 @onready var damage_timer = $damageTimer var health : int var can_take_damage : bool = true # Called when the node enters the scene tree for the first time. func _ready(): damage_timer.connect("timeout", allow_damage) health = max_health emit_signal("on_health_changed", health) func _on_body_entered(body): if body.is_in_group("health"): heal(body) elif body.is_in_group("coin"): emit_signal("on_point_gained") body.queue_free() func _process(delta): for body in get_overlapping_bodies(): if body.is_in_group("enemy"): take_damage() func take_damage(): if can_take_damage: health = health - 1 emit_signal("on_health_changed", health) if health <= 0: get_tree().paused = true else: can_take_damage = false damage_timer.start() func heal(body): if health < max_health: health = health + 1 emit_signal("on_health_changed", health) body.queue_free() func allow_damage(): can_take_damage = trueSignalsIf you copy and paste the above, you'll still need to manually connect the on_body_entered signal!
And that's the player side of health done! Let's move onto the UI side!
Health UI
UI Setup
Time to start making some UI!
For our UI, we're going to use something called an Autoload node (This is similar to a singleton in other languages)
This, as the name suggests, automatically loads independent of our other scenes, and can also be easily accessed from any other node!
Let's make a new scene, of, as you may have guessed, type User Interface. call the Root node "UI"
As a child of this node, add a new CanvasLayer Node.
To the CanvasLayer Add a child of type HBoxContainer This is a UI element that will neatly arrange our UI elements, in this case our hearts, horizontally!
Let's open its inspector, navigate to the Layout tab and change it to "Anchors." Then change the Anchor Preset to "top left." This will make sure that whatever the size of our screen is, the health will always be pinned to the top left!
Rename the node to "healthContainer" When we add hearts, this will be their parent Node, controlling their position on the screen and in relation to one another. (Like making sure they don't overlap)
Let's also, to the CanvasLayer node, and a child of type Label call it "diedLabel"
In the inspector for this label, in the Text box, write "You Died!" then look for the Theme Overrides section, open this, find Font Size and change this to about 35px.
Next, in the 2D view of the UI, move the Text so that it's where you want it, I placed mine in the middle of the screen. Then, as we want this to be hidden by default, click the little 'eye' icon next to the label in the SceneTree to hide it!
Great! That's all the UI setup we'll need to do for now (Though we'll come back to it later for points)
UI Scripting
Add a script to the root node, calling it "ui.gd"
Let's think about what we need this script to do:
- Store our three different heart images
- Recieve signals from our player when we take damage
- Update our health UI.
We'll set this up so that it automatically adjusts depending on the players max_health when the game is run, so you can easily have more (or less) than three hearts! (Or, you could implement an item that increases your max hp!)
Thankfully, we can reference images in our filesystem the same way we can reference nodes, with the Drag + Ctrl + Release technique we've been using! We'll want: The full heart image, the half heart image, and the empty heart image Find these in your filesystem, and drag in the references, it should look something like this:
const UI_HEART_EMPTY = preload("res://Assets/frames/ui_heart_empty.png")
const UI_HEART_FULL = preload("res://Assets/frames/ui_heart_full.png")
const UI_HEART_HALF = preload("res://Assets/frames/ui_heart_half.png")
Let's also get a reference to our healthContainer node, our diedLabel node, and create a variable to keep track of the most health we've had so far (This lets us know how many empty hearts to have!) We won't set this variable here, as it'll be set by whatever the most health we've had so far has been. We'll again use the Drag + Ctrl + Release technique.
@onready var health_container = $CanvasLayer/healthContainer
@onready var died_label = $CanvasLayer/diedLabel
var maxHealth : int = 0
Next will be the function that our signal will call, where most of the logic will happen, so let's think about what we need it to do!
If our health is set to 0, show the "You died text" Otherwise, If the health received is bigger than our highest health so far, make that our new highest health. Easy enough!
func changed_health(newHealth : int):
    if(newHealth == 0):
        died_label.visible = true

    if newHealth > maxHealth:
        maxHealth = newHealth
We'll want to check if we have enough hearts currently to represent that, if we don't, we'll need to add some more. (We'll create the function for this last)
    if(maxHealth/2 > healthContainer.get_child_count()):
        for h in (maxHealth/2) - healthContainer.get_child_count():
            add_heart()
We'll iterate through all the children our healthContainer node has, and assign an image based on the current health.
This section may look complicated, but once you get your head around it, it's fairly simple! Spend some time looking over it, and thinking about the conditions for each heart to be drawn. When I was figuring out how to program this, I found it useful to draw out the hearts on paper, at different levels of health!
for i in healthContainer.get_child_count():
        if (i * 2) + 1 < newHealth:
            healthContainer.get_child(i).texture = UI_HEART_FULL
        elif (i * 2) < newHealth:
            healthContainer.get_child(i).texture = UI_HEART_HALF
        else:
            healthContainer.get_child(i).texture = UI_HEART_EMPTY
Giving us a full changed_health function that looks like this:
func changed_health(newHealth : int):
    if newHealth > maxHealth:
        maxHealth = newHealth

    if(maxHealth/2 > healthContainer.get_child_count()):
        for h in (maxHealth/2) - healthContainer.get_child_count():
            add_heart()

    for i in healthContainer.get_child_count():
        if (i * 2) + 1 < newHealth:
            healthContainer.get_child(i).texture = UI_HEART_FULL
        elif (i * 2) < newHealth:
            healthContainer.get_child(i).texture = UI_HEART_HALF
        else:
            healthContainer.get_child(i).texture = UI_HEART_EMPTY
Some slightly complex math, but not too bad!
Let's add that add_heart function, which just creates and configures another child if we need one.
func add_heart():
    var img : TextureRect = TextureRect.new()
    img.expand_mode = TextureRect.EXPAND_FIT_WIDTH
    healthContainer.add_child(img)
Let's also while we're here, add an empty function for our point system, which we'll come back to later!
func add_point():
    pass
Save the scene as "UI.tscn"
Finally, we need to add the scene as an Autoload! To do this, using the top left Menu Bar, we'll navigate to Project -> Project Settings
Then, in this window, navigate to the Globals tab.
Here, click the folder icon next to the "Path" field, and find your UI.tscn scene and open it.
Change the name to be "UIGlobal"
It should look something like this:
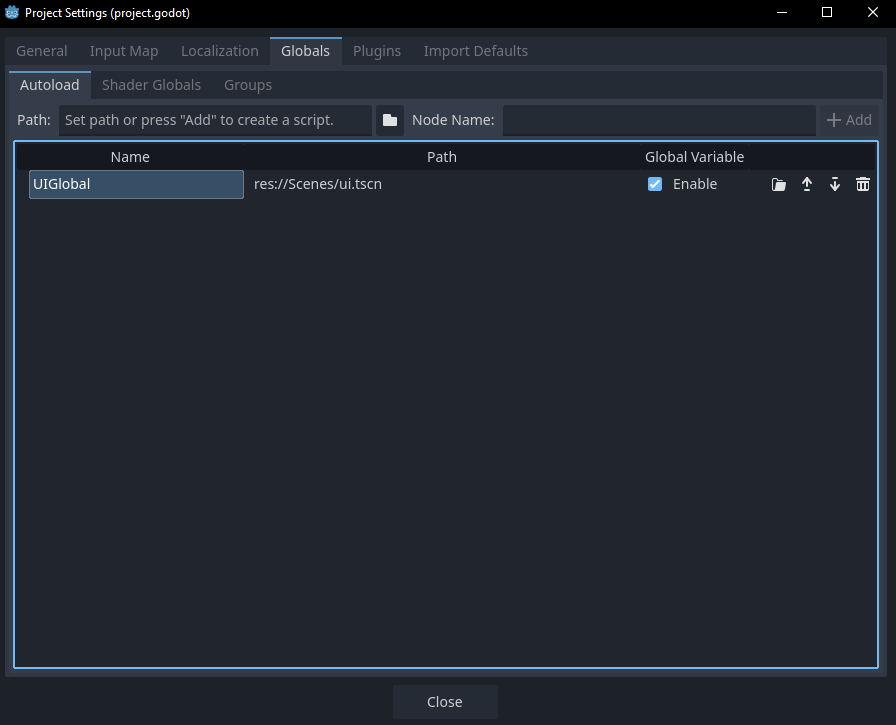
Great! You now have an autoload scene, to learn more about these check out the official Godot Docs on Singletons
Getting things connected
Finally, to get everything hooked up, we just need to connect that signal! Open up hitbox.gd
First, we'll get a reference to our new UI scene. Put this with the other variable declarations. Thankfully, because it's an autoload, this is really easy!
@onready var ui : Control = UIGlobalThen, finally, before we call the signal the first time, connect the signal with:
on_health_changed.connect(ui.changed_health)we'll also connect our point signal with:
on_point_gained.connect(ui.add_point)
Run your game! And you should have 3 hearts! Great!
- I've given the player a hitbox
- I've created the health UI
- I've created the UI script
- I've added the UI scene as an Autoload in my project settings
- My health displays!