
Tilemap Navigation
This page covers adding pathfinding to your project, using tilemaps
This guide will cover adding intelligent pathfinding to a Godot. project. If you are unfamiliar with Godot, check out the Godot basics doc as this tutorial assumes basic knowledge of navigating and using the Godot Engine.
This project can be used in conjunction with the Dungeon Crawler Tutorial to add pathfinding to the enemies
This project uses the Dungeon Tileset II tileset by Ox72, generously available for free under the CC-0 licence.
This guide is up-to-date with Godot 4.4 stable official release, and will likely work with any version of Godot newer than 4.3. Due to the use of TileMapLayers which were introduced in 4.3, this tutorial isn't compatible with any version pre 4.3
Links to the official Godot docs for topics covered in this section for further clarification:
Groups NavigationRegion2D NavigationRegion2D TileMapLayer Signals
Setup
This guide assumes you have some knowledge of working in Godot, and will only briefly cover setting up an initial scene before getting into TileMap Navigation.
If you are confused at any point, all of the skills required to complete this guide are covered in the Dungeon Crawler Tutorial which is a great way to get started with Godot.
If you have an existing project, or feel confident with Godot, feel free to skip to the Navigation section.
Player Scene
Your player scene only needs to contain the basics for movement and collision. Art is optional, but mine will have a basic AnimatedSprite2D set up.
My player scene looks like this:
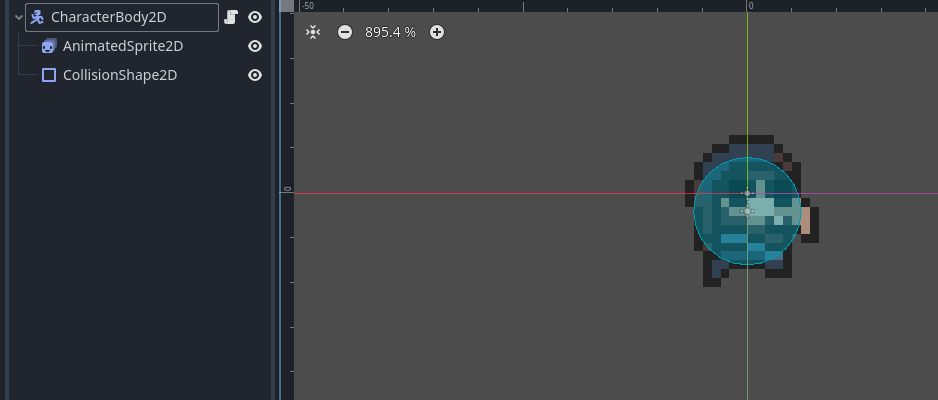
With a script that looks like this:
extends CharacterBody2D

@export var speed = 200
@onready var animated_sprite_2d = $AnimatedSprite2D

func _physics_process(delta):
	var direction = Input.get_vector("Left", "Right", "Up", "Down")
	velocity = direction * speed

	if velocity != Vector2.ZERO:
		animated_sprite_2d.play("walk")
	else:
		animated_sprite_2d.play("idle")

	if(velocity.x < 0):
		animated_sprite_2d.flip_h = true
	elif(velocity.x > 0):
		animated_sprite_2d.flip_h = false

	move_and_slide()
We'll also want to add the Root node of the player scene to a group called player as this is how the enemies will detect the player.
This is done in the Node tab of the Inspector
Enemy Scene
The initial enemy scene will be equally simple. Mine looks like this:
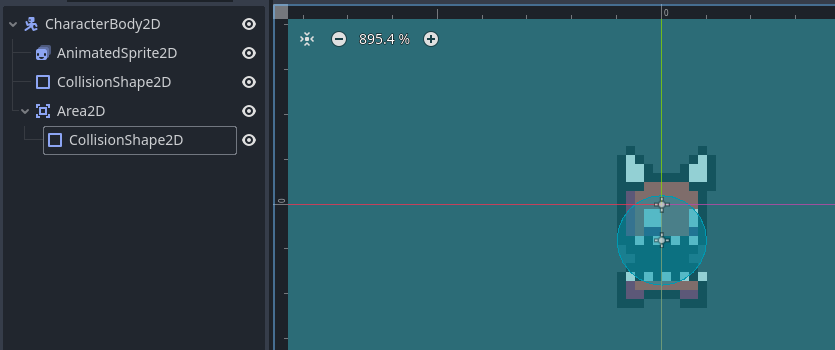
With the Area2D and its CollisionShape2D representing its "Detection range" or the range in which it will begin to pursue the player.
This script uses signals, connected from the Area2D Node, if you copy and paste the code be sure to connect the signals yourself in the Node tab of the inspector, or the script won't work.
With a script like this:
extends CharacterBody2D

var target

@export var speed : float = 50.0
@onready var animated_sprite_2d = $AnimatedSprite2D

func _process(delta):
	if(target != null):

		#Movement code will go here

		if(target.global_position.x < global_position.x):
			animated_sprite_2d.flip_h = true
		else:
			animated_sprite_2d.flip_h = false

		move_and_slide()


func _on_range_body_entered(body):
	if(body.is_in_group("player")):
		target = body
		animated_sprite_2d.play("move")

func _on_range_body_exited(body):
	if(body.is_in_group("player")):
		animated_sprite_2d.play("idle")
Tilemap
Our initial level scene will also be quite simple, consisting of two TileMapLayers, one containing the floor, and one containing the walls!
My scene looks like this, I've created a small maze for the enemies to navigate:

We'll want to make sure our Walls layer has had a Physics Layer added, and has collision painted onto the tiles.
A physics layer can be added in the inspector of the TileMapLayer under the Physics Layers tab (Making sure to first click on the TileSet object in the inspector)
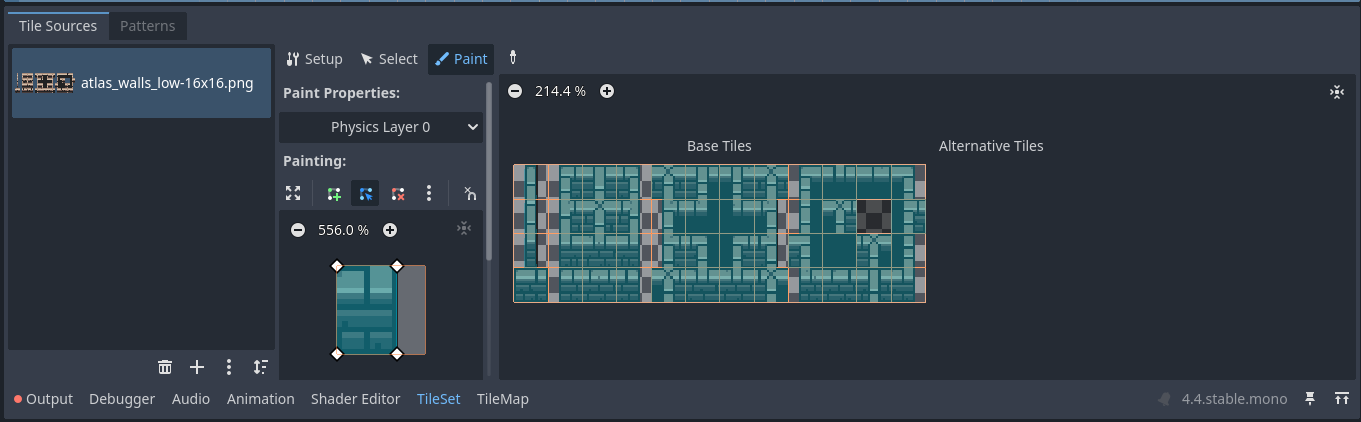
Collision can be added under the Tileset Tab at the bottom of the screen, using the Paint option. Then selecting Collision Layer 0
My collision looks like this:
Great! That's all the setup we need, now we can move on to actually adding the ability for our enemies to navigate our level!
Navigation
Adding navigation to our enemies is actually very simple! We'll only need to make a few changes to our level and enemy scene. First we'll need to add a NavigationRegion2D to our level, and make it use our Wall tileset.
Then, we'll need to allow our enemy to read this, and use it to navigate. Let's get straight into it!
Changes to the Level
Adding the level side of our navigation is easy!
We'll want to add a new NavigationRegion2D node as a child of the root node, and reparent the walls to be a child of this node.
It should look like this:
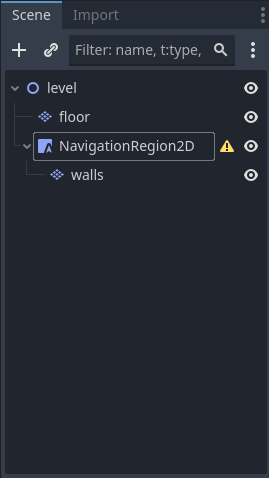
In the inspector of the NavigationRegion2D we'll then want to create a new Navigation Polygon
Then, using the Create Points tool, selected from the top bar (This should be selected by default) we'll want to add points, to create a shape that covers our entire level.
Don't worry, you can change this later if your level changes! You can also use the Delete Points tool if you make a mistake.

Make sure you close the shape by connecting your last line back to your first point. Once you've done this, if you've done everything correctly you should see it automatically generates navigation polygons!
This should cover the region of your level that Doesn't contain walls, which is where your enemies will walk!
Mine looks like this:
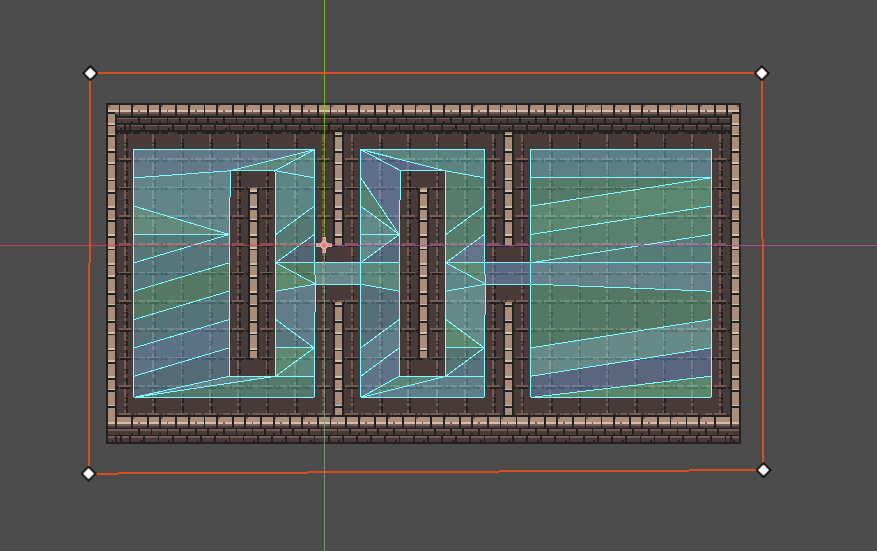
And that's all we need to do for the level! Note that if you have multiple levels, they'll all need a NavigationRegion2D
Changes to the Enemy
The changes we need to make to our enemy scene are slightly more complicated, but only because we need to change the script a little.
First, we'll want to add a new NavigationAgent2D node to the Scene, as a child of the root node.
Leaving the Enemy scene looking like this:
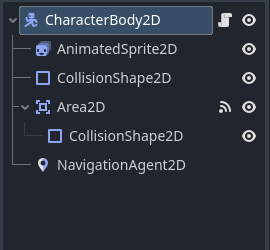
Let's also change some settings on the root CharacterBody2D Node.
At the very top we'll change the Motion Mode to Floating
and the Wall Min Slide to 0
These will help stop our Enemy from getting stuck on corners!
Then, let's move on to the script!
We'll first want to get a reference to the NavigationAgent2D using the CTRL + Drag trick!
Which should give us something like this, up with the other variable declarations:
@onready var navigation_agent_2d: NavigationAgent2D = $NavigationAgent2DThen, in the _physics_process function, we'll want to set the target of the NavigationAgent2D to be our target's global position. (How you assign your target is up to you!)
Though we'll first want to check we have a target!
func _physics_process(delta):
    if(target != null):

        navigation_agent_2d.target_position = target.global_position
Then, we'll want to get the next path position from our NavigationAgent2D (This is the next position our agent targets, on itss route to its final goal)
var next_position = navigation_agent_2d.get_next_path_position()Then, finally, we'll assign our velocity to be the direction to this position, multiplied by our speed!
velocity = global_position.direction_to(next_position) * speedGiving us a final script that looks like this:
extends CharacterBody2D

var target

@export var speed : float = 50.0
@onready var animated_sprite_2d = $AnimatedSprite2D
@onready var navigation_agent_2d: NavigationAgent2D = $NavigationAgent2D

func _physics_process(delta):
    if(target != null):

        navigation_agent_2d.target_position = target.global_position

        var next_position = navigation_agent_2d.get_next_path_position()
        velocity = global_position.direction_to(next_position) * speed


        if(target.global_position.x < global_position.x):
            animated_sprite_2d.flip_h = true
        else:
            animated_sprite_2d.flip_h = false

        move_and_slide()


func _on_range_body_entered(body):
    if(body.is_in_group("player")):
        target = body
        animated_sprite_2d.play("walk")

func _on_range_body_exited(body):
    if(body.is_in_group("player")):
        target = null
        animated_sprite_2d.play("idle")
Now, if we add everything to a scene together, and make sure all our groups are assigned, we should see our enemies pathfinding toward the player after we enter the detection range!
Try to set up a maze for your enemies to navigate! See how they deal with splits in the path, or if you can trick them into getting stuck!
If they don't work, make sure your groups are set up correctly (That the player is assigned to a group called "player") and make sure that your signals are connected if you copy and pasted the code!
Congratulations! You've added pathfinding to your enemies! We can't wait to see what you use these skills for!